Showing posts with label stock. Show all posts

Download Android 4.4.x KitKat PA Gapps! [Stock/Full/Mini/Micro/Nano/Pico]


Need to download a Gapps package for your Android 4.4.x KitKat device? This is your central place to get the perfect Gapps build! With 7 different variants of PA Gapps for you to download you're going to find the perfect one that fits your needs and just works! Have limited storage? Use Pico, Nano, or Micro. Want to have all your basic Google apps like the Gmail, YouTube, Maps, Camera? Use Full or Stock!

Just about every single custom ROM requires you to flash Gapps right after flashing the ROM. Custom ROMS like CyanogenMod, Paranoid Android, AOKP, etc all require this! Without flashing Gapps you won't have access to any Google services like the Play Store, Chrome, YouTube, and Gmail.

Simply download your choice of PA Gapps (links below), enter into custom Recovery (TWRP/CWM), flash the Gapps package just like any other zip file, reboot, and you're done! You now have Google services like the Google Play Store, Chrome, Gmail, YouTube, Maps, so many more!

Don't download from unreliable places where you could be putting your phone at risk! Use the download links below to download PA Gapps for Android 4.4.x KitKat directly from my server!

Android 4.4.x KitKat PA Gapps Variants:
  • Stock - Recommended for most users
  • Full
  • Mini
  • Mico
  • Nano - Recommended if you have an older device/limited storage
  • Pico - Recommend if you have an older device/limited storage
  • Pico(Uni)
Click below to show PA Gapps Chart!


Download PA Gapps for Android 4.4.x KitKat using the download links below!

Download Stock PA Gapps for Android 4.4.x KitKat
Download Full PA Gapps for Android 4.4.x KitKat
Download Mini PA Gapps for Android 4.4.x KitKat
Download Micro PA Gapps for Android 4.4.x KitKat
Download Nano PA Gapps for Android 4.4.x KitKat
Download Pico PA Gapps for Android 4.4.x KitKat
Download Pico(Uni) PA Gapps for Android 4.4.x KitKat

Credits go to XDA member, TKruzze!
-----------------------------------------------------------------------------------------------------------------------------
Need Help With Your Android Device? Follow Me / Add Me / Like Me 
Twitter 
Facebook 
Google Plus
-----------------------------------------------------------------------------------------------------------------------------
Check Out Our YouTube Channel For More Great Guides! 
YouTube

Download Android 5.1.x Lollipop PA Gapps! [Stock/Full/Mini/Micro/Nano/Pico]


Welcome to the central place to download the perfect build of Gapps for Android 5.1.x Lollipop based on your needs and preference. If you just got the latest phone or still rockin an old legacy device you will find the perfect Gapps build for your phone. 

Just about every custom ROM requires you to flash Gapps right after the ROM. If you don't you're phone will become virtually useless. You won't have access to the Play Store, Gmail, Chrome, and all the other Google services. 

Simply download you choice of Android 5.1.x Gapps (linked below), enter into custom Recovery (TWRP/CWM), flash it like any other zip file, reboot, and enjoy!


Android 5.1.x Lollipop Gapps Variants:
  • Stock - Recommended for most users
  • Full
  • Mini
  • Micro
  • Nano - Recommend for legacy/older devices
  • Pico - Recommended for legacy/older devices
  • Pico(Uni) 
- If you are running into any scaling, DPI, or visual issues after flash a Gapps build try the Pico(Uni). The Pico(Uni) is customized to be universally compatible with all screen DPI variants. 
- If you are running on a legacy/older device I recommend using Pico or Nano Gapps packages.

Click below to show PA Gapps Chart!


Download PA Gapps for Android 5.1.x Lollipop using the download links below!
Download Stock PA Gapps for Android 5.1.x Lollipop
Download Full PA Gapps for Android 5.1.x Lollipop
Download Mini PA Gapps for Android 5.1.x Lollipop
Download Micro PA Gapps for Android 5.1.x Lollipop
Download Nano PA Gapps for Android 5.1.x Lollipop
Download Pico PA Gapps for Android 5.1.x Lollipop
Download Pico(Uni) PA Gapps for Android 5.1.x Lollipop


Credits go to XDA member, TKruzze!
-----------------------------------------------------------------------------------------------------------------------------
Need Help With Your Android Device? Follow Me / Add Me / Like Me 
Twitter 
Facebook 
Google Plus
-----------------------------------------------------------------------------------------------------------------------------
Check Out Our YouTube Channel For More Great Guides! 
YouTube

Download Android 5.0.x Lollipop PA Gapps! [Stock/Full/Mini/Micro/Nano/Pico]


This is your central place to get the perfect build of Gapps for your Android 5.0.x Lollipop device. If you just got the latest flagship phone or still hanging onto the an older legacy device you can find the perfect Gapps package to fit your needs!

These Gapps packages are compatible with virtually all ROMS including Paranoid Android (PA), CyanogenMod, AOKP, etc. 

Simply flash the Gapps package inside custom Recovery (TWRP/CWM), reboot, and you're set. 
  • If you run into storage issue when flash the Gapps package then try Pico or Nano Gapps.
  • If you get an error during installation make sure you're on the latest version of TWRP/CWM. 
If you have an older device, with limited storage use pico or nano!

Gapps Variants:
  • Stock - Recommended for most users.
  • Full
  • Mini
  • Micro
  • Nano
  • Pico
  • Pico(Uni)

Click below to show PA Gapps Chart!


Download Android 5.0.x Gapps using the download links below!

Download Stock Gapps for Android 5.0.x Lollipop 


Credits go to XDA member, TKruzze!
-----------------------------------------------------------------------------------------------------------------------------
Need Help With Your Android Device? Follow Me / Add Me / Like Me 
Twitter 
Facebook 
Google Plus
-----------------------------------------------------------------------------------------------------------------------------
Check Out Our YouTube Channel For More Great Guides! 
YouTube

How to Enter Into Recovery Mode on Nexus 6!

Check Out The Video Below!

Entering into recovery mode can be a little bit of a challenge with the Nexus 6 since both the power button and volume keys are located on the same side of the phone. This requires us to use both hands to complete this task, but it can easily be done after a single try! 

Recovery mode is great since rooted Nexus 6 users can install custom ROMS, perform Nandroid Backups, wipe their device, and so much more! For people that are on stock recovery they still have a few options like a factory reset, installing flashable zips, and a few others. 

Follow the guide below to learn how to enter into Recovery Mode on the Nexus 6!

1. Power off the Nexus 6 and make sure your phone is unplugged.


2. Press and hold the power button and volume down button at the same time until you see a green "Start" on the screen.


3. Press the volume down until you see "Recovery mode". Now press the power button.


4. You will now be entered into Recovery Mode! Now depending on if you're rooted and have TWRP or CWM Recovery installed you will see something a little bit different or if you're not rooted you will enter into stock recovery.


If you see a dead Android with his chest open like the picture below follow this guide.


-----------------------------------------------------------------------------------------------------------------------------
Need Help With Your Android Device? Follow Me / Add Me / Like Me 
Twitter 
Facebook 
Google Plus
-----------------------------------------------------------------------------------------------------------------------------
Check Out Our YouTube Channel For More Great Guides! 
YouTube and Subscribe
-----------------------------------------------------------------------------------------------------------------------------
Don't Forget Our Weekly Android App Reviews!
Check Them Out, Here!

Nexus 6 One-Click Mac Toolkit! Root & Unroot


The Nexus 6 One-Click Mac Toolkit makes it easy for anyone who owns a Nexus 6 and wants to get their device rooted or return back to complete stock! While there are many toolkits for the Nexus 6 all of those toolkits are only for Windows, luckily for anyone who owns a Mac you have this toolkit! 

How Do I Use These Toolkits?
1. Download the toolkit of your choice (download links below).
2. Unzip the toolkit and click on the green Android figure, if you don't see this then click on the file that ends in .tool. 
3. Follow the directions on the screen. 

If you don't know how to enable Developer options, Enable OEM unlock, or enter into Bootloader mode refer to the FAQ section at the bottom of this article. 

Download the Nexus 6 One-Click Mac Toolkits using the download links below!

Download Nexus 6 One-Click Root Toolkit
Download Nexus 6 One-Click Unroot/Stock Toolkit

What Does The Nexus 6 One-Click Root Toolkit Do?
The root toolkit will unlock the bootloader, install TWRP recovery, and give you step-by-step intructions on installing SuperSU to get full root access on the Nexus 6. 

What Does The Nexus 6 One-Click Unroot Toolkit Do?
The unroot toolkit will completely restore the Nexus 6 back to stock using the included Google factory images and it will also lock the bootloader. This toolkit also comes in handy if you want to completely wipe the Nexus 6 or if you need to unbrick the Nexus 6.

FAQ:
Q: How do I enable Developer options and OEM unlock?
A: Go into Settings > About phone and tap on "Build number" 5 for 6 times until it says "You are now a developer" and then press the back button once. Choose "Developer options" and check mark "Enable OEM unlock".

Q: How do I enter into Bootloader mode?
A: First power down the Nexus 6, then press and hold the power button and volume down button at the same time until you see a green "Start" on the screen.
-----------------------------------------------------------------------------------------------------------------------------
Need Help With Your Android Device? Follow Me / Add Me / Like Me 
Twitter 
Facebook 
Google Plus
-----------------------------------------------------------------------------------------------------------------------------
Check Out Our YouTube Channel For More Great Guides! 
YouTube and Subscribe
-----------------------------------------------------------------------------------------------------------------------------

How to Unroot Galaxy S5! | Complete Stock | Unbrick

Check Out the Video Below!


Anyone who wants to unroot / unbrick their Galaxy S5 can easily by using Odin and the correct stock firmware for their Galaxy S5 device.


With this step-by-step guide it will show you how to completely unroot your Galaxy S5, remove any custom recovery, and unbrick your phone if you are stuck in a boot loop. This will get you back to 100% stock Touchwiz. 


This guide will work with all major Galaxy S5 variants including: 

  • T-Mobile Galaxy S5 SM-G900T
  • AT&T Galaxy S5 SM-G900A
  • Verizon Galaxy S5 SM-G900V
  • Sprint Galaxy S5 SM-G900P
  • US Cellular Galaxy S5 SM-G900R
  • Canadian Rogers Galaxy S5 SM-G900W8
  • Canadian Bell Galaxy S5 SM-G900W8
  • Canadian Telus Galaxy S5 SM-G900W8
  • International Galaxy S5 SM-G900F
  • International Galaxy S5 SM-G900H


This guide is especially useful if you plan on sending back the Galaxy S5 to your carrier since this will make it just like the day you first got your phone. 

This will DELETE EVERYTHING from your phone! Back it up!


1. Enter your phone into "Download Mode". Make sure your phone is unplugged and turned off. Press and hold the volume down, home center, and power button at the same time.


2. Press the volume up to continue and plug in your phone via microUSB.


3. Download Odin and the stock tar.md5 file using the links below.

Download Odin

Download stock files for the Galaxy S5 for your specific model


4. Unzip and open Odin3 v1.85. In Odin you should see a yellow highlighted box on the left of the program. If you don't, download and install Samsung USB drivers


5. Unzip the stock tar file you downloaded then click on "PDA" and locate the tar.md5 file that was extracted.


6. Make sure only "Auto Reboot" and "PDA" is check marked. Then click on "Start". This process will take about 4-8 minutes.


7. Once Odin is complete it will show "Pass".


Your phone will now fully boot up and you will be on stock Samsung Touchwiz, but your apps, app data, contacts, text message, etc will be still on your phone. 


If you want to remove everything or if you got stuck in a boot loop during this part keep following the rest of the steps.


8. Unplug your phone and power off your phone. (If your stuck in a boot loop just keep holding down the power button until it turns off).


9. Press and hold the volume up, home button, and power button at all the same time. You should be entering into stock recovery.


10. Select "wipe data/factory reset" then choose "yes".


11. After that select "wipe cache partition" and choose "yes".


12. Finally select "reboot system now" and your phone will completely boot up with all the user data deleted.


FAQ: 

Q: Odin doesn't show the yellow box when my phone is in Download Mode and plugged into my computer. 
A: Make sure your using the original Samsung USB cable, change USB ports, install Samsung USB drivers, and restart your computer. 

Q: Does this reset Know counter? 
A: No this does not reset Knox counter. 
-----------------------------------------------------------------------------------------------------------------------------
Need Help With Your Android Device? Follow Me / Add Me / Like Me 
Twitter 
Facebook 
Google Plus
-----------------------------------------------------------------------------------------------------------------------------
Check Out Our YouTube Channel For More Great Guides! 
YouTube and Subscribe
-----------------------------------------------------------------------------------------------------------------------------
Don't Forget Our Weekly Android App Reviews!
Check Them Out, Here!

How to Unroot/Unbrick AT&T Galaxy S4 SGH-i337! - Compete Stock


Anyone who wants to unroot/unbrick their Galaxy S4 they can easily by using Odin and the correct stock firmware for their AT&T SGH-i337 Galaxy S4. With this step-by-step guide it will show you how to completely unroot your AT&T Galaxy S4, remove any custom recovery and unbrick your phone if you are in a boot loop. 

Follow the guide below to unroot/unbrick AT&T Galaxy S4 SGH-i337.

1. Enter your phone into "Download Mode". Make sure your phone is unplugged and turned off. Hold the volume down, home center, and power button at the same time. When you feel a vibration let go of the power, but keep holding onto the volume down and home button.

2. Press the volume up to continue and plug in your phone via microUSB.

3. Download Odin, pit, and tar.md5 files using the links below.

Download Odin
Download JFLTE_USA_ATT_16G.pit
Download AP_I337UCUEMK2_1921628_REV06_user_low_ship_MULTI_C ERT.tar.md5

4. Unzip and open Odin3 v1.85. In Odin you should see a yellow highlighted box on the left of the program. If you don't, download and install Samsung USB drivers.

5. Click on "PIT" then locate and select "JFLTE_USA_ATT_16G.pit"

6.  Click on "PDA" then locate and select AP_I337UCUEMK2_1921628_REV06_user_low_ship_MULTI_C ERT.tar.md5.

7. Now click on "Start". The entire process will take about 5-10 minutes. 

8. Once Odin is complete it will say "Pass". Now unplug your phone

9. You will now see a Android figure on your screen. Wait till you see "Samsung Galaxy S4" and then take out the battery and put it back in.

10. Now enter into Recovery Mode. Hold the volume up, home center, and power button at the same time. When you feel a vibration let go of the power, but keep holding onto the volume up and home button.

11. Select "wipe data/factory reset" > "Yes". 

12. Then "reboot system now". 

13. You are now on stock Android! You are unrooted, on stock recovery, and unbricked! You can now send this to Samsung/AT&T without them knowing you ever modified with your phone

Credits - XDA
-----------------------------------------------------------------------------------------------------------------------------
Need Help With Your Android Device? Follow Me / Add Me / Like Me 
Twitter 
Facebook 
Google Plus
-----------------------------------------------------------------------------------------------------------------------------
Check Out Our YouTube Channel For More Great Guides! 
YouTube and Subscribe
-----------------------------------------------------------------------------------------------------------------------------
Galaxy S4 FAQ 
How to Root Galaxy S4 
How to Install Custom ROMS on Galaxy S4 
Please Check Out The Galaxy S4 FAQ Section Before Commenting!
-----------------------------------------------------------------------------------------------------------------------------

Stock Android 4.4 KitKat ROM for Nexus 4! - Rooted

Check Out The Video Below!

Stock Android 4.4 KitKat ROM for the Nexus 4 makes it easy to just simply flash this ROM using a custom recovery to get to the latest version of Android. 

If you weren't aware if your rooted you cannot get OTA updates, meaning that your stuck on the current version of Android unless you unroot and wait for the OTA update or wait for a custom ROM that you like to be updated.

Either way flashing this stock Android 4.4 ROM makes it easy for you to upgrade the Nexus 4 to Android 4.4 KitKat without any problems. Also this ROM already comes rooted! 

Download Stock Android 4.4 KitKat ROM for Nexus 4 using the link below!

Download Stock & Rooted Android 4.4 ROM for Nexus 4

Credits - XDA
-----------------------------------------------------------------------------------------------------------------------------
Need Help With Your Android Device? Follow Me / Add Me / Like Me 
Twitter 
Facebook 
Google Plus
-----------------------------------------------------------------------------------------------------------------------------
Check Out Our YouTube Channel For More Great Guides! 
YouTube and Subscribe
-----------------------------------------------------------------------------------------------------------------------------
Nexus 4 FAQ 
How to Root Nexus 4 
How to Install Custom ROMS on Nexus 4 
Please Check Out The Nexus 4 FAQ Section Before Commenting!
-----------------------------------------------------------------------------------------------------------------------------

Stock 4.3 ROM for Galaxy Nexus! - Rooted [GSM/Verizon]

Check Out The Video!

With yet another Android release for the Galaxy Nexus it's time to upgrade our phone to the latest and greatest Android version we possibly can! If your unrooted you can simply wait for an OTA update to upgrade your device, but if your rooted you can't get OTA updates. 

Instead of unrootng your phone, upgrading, and then rooting your phone, you can simply flash the Android 4.3 stock ROM for your Galaxy Nexus. This ROM is complely stock and is the same as an OTA update from Google. The only benefits are that you stay rooted! 

Google's latest Android update brings more "under the hood" improvements and tweaks than anything else. With better graphics, performance, and battery life to your Galaxy Nexus. Some visual changes are slightly changed like the interface in the camera app and the photosphere stitches the pictures significantly better. 

Download the stock 4.3 ROM for Galaxy Nexus GSM and Verizon using the links below!
Download Stock 4.3 ROM for Galaxy Nexus GSM
Download Stock 4.3 ROM for Galaxy Nexus Verizon
Download Gapps for Galaxy Nexus Verizon
Download SuperSU for Android 4.3 
How to Install on Galaxy Nexus GSM: 
1. Download the ROM to your phone.
2. Enter into recovery mode and wipe your phone.
3. Flash the 4.3 stock ROM .
4. Reboot. If your running on CWM then you will get an option to "Disable Recovery", select "No". 

How to install on Galaxy Nexus Verizon: 
1. Download the ROM, Gapps, and SuperSU to your phone.
2. Enter into recovery mode and wipe your phone.
3. Flash the 4.3 stock ROM and Gapps.
4. Reboot. 
5. Enter back into recovery mode and flash SuperSU. 
6. Reboot your phone. If your running on CWM then you will get an option to "Disable Recovery", select "No". 

Credits - GSM & Verizon
-----------------------------------------------------------------------------------------------------------------------------
Need Help With Your Android Device? Follow Me / Add Me / Like Me 
Twitter 
Facebook 
Google Plus
-----------------------------------------------------------------------------------------------------------------------------
Check Out Our YouTube Channel For More Great Guides! 
YouTube and Subscribe
-----------------------------------------------------------------------------------------------------------------------------
Galaxy Nexus FAQ 
How to Root Galaxy Nexus 
How to Install Custom ROMS on Galaxy Nexus 
Please Check Out The Galaxy Nexus FAQ Section Before Commenting!
-----------------------------------------------------------------------------------------------------------------------------

How to Unroot Galaxy S3 on Mac OSX! - Complete Stock

Check Out The Video!

Here is a step-by-step tutorial showing you how to completely unroot your Samsung Galaxy S3 on a Mac OSX computer. Recently Heimdall has been updated to support all Galaxy S3 variants so now using the Heimdall Mac application we can easily flash stock tar files! 

Once this process is completed you will be able to send your phone back to your carrier/manufacture without them ever knowing your "modified" your phone. 


This guide will support just about ever Galaxy S3 variant including: GT-i9300, T-Mobile SGH-T999, AT&T SGH-i747, Verizon SCH-i535, Sprint SPH-L710, and Bell/Telus/Rogers SGH-i747M. 

If your running on Mac OSX 10.6-10.7 this MAY NOT work for you!

NOTE! This will WIPE EVERYTHING off your internal phone memory, back it up!!

If you are going to send your Galaxy S3 back to your carrier/manufacture you FIRST need to reset flash/binary counter!

1. Enter your phone into Download Mode. Turn off your phone then press the volume down, power and home center button. Once your phone vibrates ONLY let go of the power button. 


2. Press the volume up to continue and plug in your phone via microUSB.


3. Download/install Heimdall and Samsung Kies to your computer using the links below. Note: Both applications require you to restart your computer!

Download Heimdall
Download Samsung Kies


4. Now go into your Applications folder and open "heimdall-frontend". 


5. Go into "Utilities" tab and click on "Detect". Click on "Save As..." and name the file to anything your want. Ex. GalaxyS3PitFile. Then click on "Download". 

Also remember where you saved the file! 


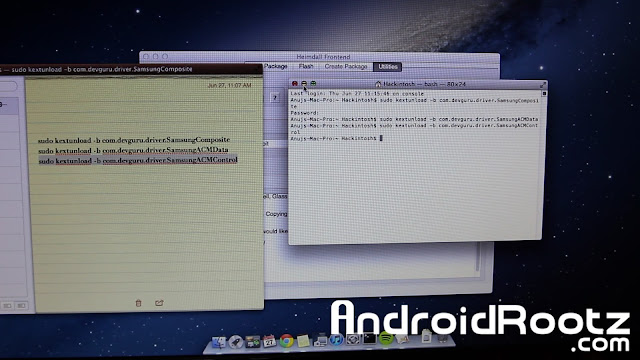
6. Skip this step if your didn't get "ERROR: Claim interface failed!". Open Terminal and copy and paste these commands individually into terminal (watch the video above for detailed instructions). Then repeat step 5. 

sudo kextunload -b com.devguru.driver.SamsungComposite
sudo kextunload -b com.devguru.driver.SamsungACMData
sudo kextunload -b com.devguru.driver.SamsungACMControl


7. Download the correct stock zip file to your computer for your Galaxy S3 using the link below.

Download stock tar file for Galaxy S3


8. Unzip the stock file. Open the folder and you should now have a file like this, "XXXXXX.tar.md5" rename the file to only "XXXXXX.tar" and untar the renamed file. (watch the video above for detailed instructions). 


9. Go back to Heimdall Frontend and click on the "Flash" tab. Under the PIT section click on "Browse" and locate and select the PIT file you saved in step 5. 


10. Click on "Add" and select "ABOOT". Then click on "Browse" and locate "aboot.mbn". It is the folder that was renamed and untarred. Then click "Add" and do the process again for the all files in the folder (watch the video above for detailed instructions). 

aboot.mbn --- ABOOT 
boot.img --- BOOT
cache.img.ext4 --- CACHE
NON-HLOS.bin --- MODEM
recovery.img --- RECOVERY 
rpm.mbn --- RPM
sbl2.mbn --- SLB2
sbl3.mbn --- SLB3
system.img.ext4 --- SYSTEM
tz.mbn --- TZ


11. Once you have selected and located all 10 files, uncheck ("Resume use after "No Reboot"). Then click on "Start". 


12. Skip this step if your didn't get "ERROR: Claim interface failed!". Open Terminal and copy and paste these commands individually into terminal (watch the video above for detailed instructions). Then repeat step 11. 

sudo kextunload -b com.devguru.driver.SamsungComposite
sudo kextunload -b com.devguru.driver.SamsungACMData
sudo kextunload -b com.devguru.driver.SamsungACMControl 


If that doesn't work then unlpug your phone, take out the battery, put it back in, and enter back into Download Mode. After that plug in your phone and repeat step 11. 


13. Heimdall will now flash all the stock files to your phone. This process will take about 5-10 minutes. 


14. Once the process is complete your phone will automatically reboot. During the reboot process you will see a green Android, once the green Android loading screen goes away enter into recovery mode. 


15. Take out the battery and put it back in. Press the volume up, power button, and home center button. Once you feel a vibration ONLY let go of the power button. 


16. Select "wipe data/factory reset" then choose "wipe cache partition". Lastly, select "reboot system now". 


17. Once your phone finishes rebooting in about 5 minutes your Galaxy S3 is on completely stock and unrooted! Safe enough to send back to your carrier/manufacture. 


Credits - Heimdall
-----------------------------------------------------------------------------------------------------------------------------
Need Help With Your Android Device? Follow Me / Add Me / Like Me 
Twitter 
Facebook 
Google Plus
-----------------------------------------------------------------------------------------------------------------------------
Check Out Our YouTube Channel For More Great Guides! 
YouTube and Subscribe
-----------------------------------------------------------------------------------------------------------------------------
Galaxy S3 FAQ 
How to Root Galaxy S3 
How to Install Custom ROMS on Galaxy S3 
Please Check Out The Galaxy S3 FAQ Section Before Commenting!
-----------------------------------------------------------------------------------------------------------------------------